
Step 1: Creating a New Bot and Configuring the Flowchart
A: Log in to your BluChatbot account and ensure you have the necessary permissions.

B: Access the Bot management section by clicking on the Bot Icon on your dashboard.
C: Click “Robots” and then the “+” button to create a new bot.

D: Provide a relevant name for your new bot and uncheck the “AI” checkbox.
E: Click “Save” to create your new bot.
F: Access your newly created bot from the “Bots” menu on your dashboard.

Step 2: Creating a Flowchart
A: From the “Bots” menu, select the bot you wish to create a flowchart for.
B: Click the three dots next to the selected bot and choose “Flow” to enter the flowchart editor.

C: You will be redirected to the flowchart editor page, where you can visually design the conversation flow.
D: Start and End Nodes are already present in the editor, with the Start Node initiating the conversation and the End Node marking the conclusion.

Understanding Node Elements
- Name of the Node: Labels the node for easy identification.
- Input and Output Points: Allow you to connect nodes and control the flow, just drag from the output point towards the input point of the other node.


- Node Type-Specific Requirements: Each node type has specific functionalities.
- Deleting the Node: When you right-click on the node, it gives you the deleting button from where you can delete the node

- Deleting the Links between Nodes: When you right click on the link, it gives you the deleting button from where you can delete the link

Node Types for Your Flowchart:
1. [TEXT, OPTION]: Display text messages and create multiple-choice questions.
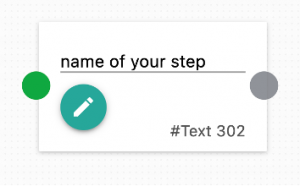
[TEXT,OPTION] Node component

[TEXT,OPTION] Node Edit component
2. [QUESTION TEXT]: Ask questions and store responses as variables for future use.
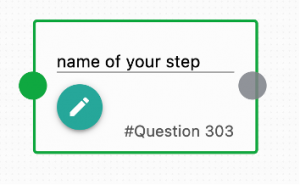
[QUESTION TEXT] Node component

[QUESTION TEXT] Node Edit component
3. [MULTIPLE OPTION]: Create multiple-choice questions and customize responses for invalid input.
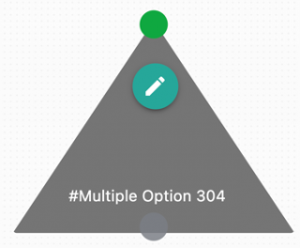
[MULTIPLE OPTION] Node component

[MULTIPLE OPTION] Node Edit component
4. [SECTOR]: Route the conversation to a specific department in the company.

[SECTOR] Node component

[SECTOR] Node Edit component
5. [AUDIO], [IMAGE], [VIDEO]: Send media content to users.
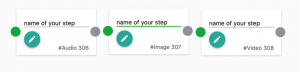
[AUDIO], [IMAGE], [VIDEO] Node component

[AUDIO] Node Edit component

[VIDEO] Node Edit component

[IMAGE] Node Edit component
6. [REQUEST]: Fetch GET requests from an API and display data in the chat.
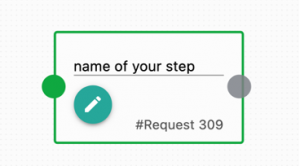
[REQUEST] Node component

[REQUEST] Node Edit component
7. [END]: Mark the end of the conversation.
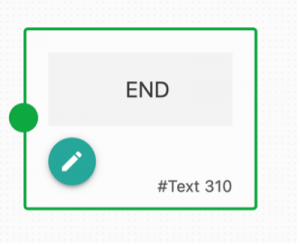
[END] Node component

[END] Node Edit component
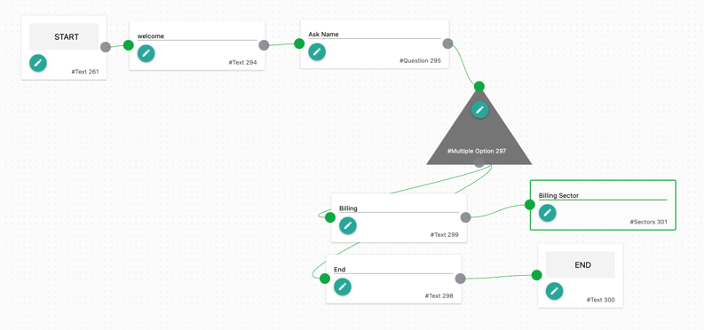
Example: Creating a Greeting Flowchart
Add a [TEXT, OPTION] node with a greeting message and connect it to the [START] node as shown in the image

Connect the greeting node to a [QUESTION TEXT] node to ask for the user’s name and store it as a variable, e.g., “user_name.”

Include a [MULTIPLE OPTION] node with options like “Billing” and “End.”

Connect the multiple choice node to two [TEXT, OPTION] nodes, representing the multiple choice options.

For the “Billing” choice, connect to a [SECTOR] node specifying the billing department. For “End,” connect to an [END] node.

In the [END] node, bid the user farewell using their name variable, “user_name.”

The Final Flowchart should look something like this.
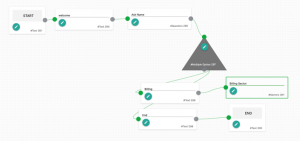
This simple flowchart will greet the user, ask for their name, allow them to make a choice, and handle the conversation accordingly. You can further customize and expand your flowchart to suit your specific use case.